Modeling Portfolio Photography Tips
So you've decided to try your hand at modeling. You know you need to put together a portfolio, but don't want to spend a fortune paying somebody else - not to mention you just aren't sure if you'll be happy with the results.
Well fret no more. You can put together your own portfolio photographs with tools available to all.
I'm going to start with the basic assumption that you have your outfits and poses already set (if not - topic for another day).
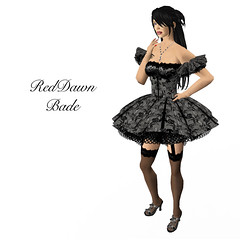
First - shoot with a white background. If you have access to something like a Photosphere or set - just set it to a white background. Of course you can always create your own set by rezzing a few prims, setting texture to blank, color white, full bright.
Second - make sure you have maximized your camera settings. Under the Client menu (Mac: Cmd-Alt-Shift-D), make sure to check the option for High-res Snapshot (only helps if you're downloading to disk first). Also, check the option under Client > Rendering > Features > Foot Shadows (Mac: Cmd-Opt-5). This will get rid of those annoying foot shadows that stand out against the white background.
I'd also recommend checking your graphics setting under Edit > Preferences (Mac: Cmd-P). As you will be shooting close up against a white background, you can turn down your draw distance (Graphics Tab) and turn up your avatar mesh detail (Graphics Detail Tab).
Third - set up some lights. If you're using a pre-built stage, you may already have lights built in - just set the to white. Once again, you can always make your own.
I like to rezz a couple of phantom spheres, use a full transparency texture (totally clear - all alpha), color white, then use the Light options under the Features tab of the prim edit menu. Move them around until you get full coverage with no shadows. Do note that you'll need to have Highlight Transparent turned on to see them (Mac: Cmd-Opt-T)
You can also use these as body lights. Link a pair of spheres together, take them into your inventory, and then attach them to your mouth (or other free spot). Once they rezz, you can move them around to get them in the best position. This is also a great way to use lights on location even if the land does not allow building.
Lastly, strike a pose and snap away. Personally, I send all my photos to my computer's hard drive. I don't really do a lot of post processing as I don't have any Photoshop skills to speak of - but I do like to review my shots, pick the best ones, crop, and maybe add a little text. Select your best and upload.
Now go show your friends, pass out your portfolio, rezz a prim and decorate your place with your own artwork using you as the subject (vanity at it's best).
Well fret no more. You can put together your own portfolio photographs with tools available to all.
I'm going to start with the basic assumption that you have your outfits and poses already set (if not - topic for another day).
First - shoot with a white background. If you have access to something like a Photosphere or set - just set it to a white background. Of course you can always create your own set by rezzing a few prims, setting texture to blank, color white, full bright.
Second - make sure you have maximized your camera settings. Under the Client menu (Mac: Cmd-Alt-Shift-D), make sure to check the option for High-res Snapshot (only helps if you're downloading to disk first). Also, check the option under Client > Rendering > Features > Foot Shadows (Mac: Cmd-Opt-5). This will get rid of those annoying foot shadows that stand out against the white background.
I'd also recommend checking your graphics setting under Edit > Preferences (Mac: Cmd-P). As you will be shooting close up against a white background, you can turn down your draw distance (Graphics Tab) and turn up your avatar mesh detail (Graphics Detail Tab).
Third - set up some lights. If you're using a pre-built stage, you may already have lights built in - just set the to white. Once again, you can always make your own.
I like to rezz a couple of phantom spheres, use a full transparency texture (totally clear - all alpha), color white, then use the Light options under the Features tab of the prim edit menu. Move them around until you get full coverage with no shadows. Do note that you'll need to have Highlight Transparent turned on to see them (Mac: Cmd-Opt-T)
As a side note: for interesting lighting effects, try changing the texture color.
You can also use these as body lights. Link a pair of spheres together, take them into your inventory, and then attach them to your mouth (or other free spot). Once they rezz, you can move them around to get them in the best position. This is also a great way to use lights on location even if the land does not allow building.
Lastly, strike a pose and snap away. Personally, I send all my photos to my computer's hard drive. I don't really do a lot of post processing as I don't have any Photoshop skills to speak of - but I do like to review my shots, pick the best ones, crop, and maybe add a little text. Select your best and upload.
Now go show your friends, pass out your portfolio, rezz a prim and decorate your place with your own artwork using you as the subject (vanity at it's best).
If you need a quite place to shoot your portfolio, feel free to stop by my studio and use my Photosphere.
RedDawn's Studio


No comments:
Post a Comment